
Rsync implementation in go
Recently, I have implemented rsync algorithm in golang. It is an interesting algorithm to remotely sync data. In this post, I’ll make a introduction about this algorithm, and how I implemented it.
The problem
The author described the problem very clearly in his paper - The rsync algorithm, Andrew Tridgell and Paul Mackerras.
Imagine you have two files, A and B, and you wish to update B to be the same as A. The obvious method is to copy A onto B. Now imagine that the two files are on machines connected by a slow communications link, for example a dial up IP link. If A is large, copying A onto B will be slow. To make it faster you could compress A before sending it, but that will usually only gain a factor of 2 to 4.
Now assume that A and B are quite similar, perhaps both derived from the same original file. To really speed things up you would need to take advantage of this similarity. A common method is to send just the differences between A and B down the link and then use this list of differences to reconstruct the file.
The problem is that the normal methods for creating a set of differences between two files rely on being able to read both files. Thus they require that both files are available beforehand at one end of the link. If they are not both available on the same machine, these algorithms cannot be used (once you had copied the file over, you wouldn’t need the differences). This is the problem that rsync addresses.
Briefly speaking, the problem is to remotely sync similar files between two machines in low bandwidth consumption.
How rsync does
Here is the formal explanation about the rsync algorithm.
Suppose we have two general purpose computers alpha and beta. Computer alpha has access to a file A and beta has access to file B , where A and B are “similar”. There is a slow communications link between alpha and beta.
The rsync algorithm consists of the following steps:
beta splits the file B into a series of non-overlapping fixed-sized blocks of size S bytes. The last block may be shorter than S bytes.
For each of these blocks beta calculates two checksums: a weak “rolling” 32-bit checksum (described below) and a strong 128-bit MD4 checksum.
beta sends these checksums to alpha.
alpha searches through A to find all blocks of length S bytes (at any offset, not just multiples of S) that have the same weak and strong checksum as one of the blocks of B. This can be done in a single pass very quickly using a special property of the rolling checksum described below.
alpha sends a sequence of instructions for constructing a copy of A. Each instruction is either a reference to a block of B, or literal data. Literal data is sent only for those sections of A which did not match any of the blocks of B.
The end result is that beta gets a copy of A, but only the pieces of A that are not found in B (plus a small amount of data for checksums and block indexes) are sent over the link. The algorithm also only requires one round trip, which minimizes the impact of the link latency.
As stated in the paper, the most important details of the algorithm are the rolling checksum and the associated multi-alternate search mechanism which allows the all-offsets checksum search to proceed very quickly.
Rolling checksum
The weak rolling checksum needs to be very cheap to calculate. So what does rolling mean? Suppose we have a sliding window of size S. rolling means that, each time to compute the weak checksum, the new checksum can be easily calculated by dropping the first byte in the window and adding a new byte to the right of the window. For example, The red byte is dropped, and the gray byte is added to calculate weaksum’ from weaksum.

So, what is weak checksum? It is called weak because that the weak checksum of a block may collide with others’ - different blocks (data is not same as each other) may have same weak checksum. While, strong checksum have no possibility to collide. It is like an ID for data blocks, different blocks must have different strong checksum so that we can distinguish them.
Calculating strong checksum is expensive. Usually we cannot do it in O(1) time complexity. This is the reason why weak checksum is used for first level check for a match of two file blocks.
Calculating weak checksum can be done in O(1). A good weak checksum calculation algorithm should have low probability of checksum matching when the blocks are not equal because the much more expensive strong checksum must be calculated for each block where the weak checksum matches.
The weak checksum algorithm proposed in the paper was inspired by Mark Adler’s adler-32 checksum. It is defined by
where s(k,l) is the rolling checksum of the bytes Xk…Xl . For simplicity and speed, M = 2^16 is used.
The The important property of this checksum is that successive values can be computed very efficiently using the recurrence relations
We can see that the calculation of weak checksum at all possible offsets can be done in O(1). Actually, besides the adler-32 like checksum, all checksums support cheap rolling calculation can be used, for example, Rabin?Karp algorithm.
Checksum searching
In this paper, the author proposed a 3 level searching scheme.
The first level uses a 16-bit hash of the 32-bit rolling checksum and a 2^16 entry hash table. The list of checksum values (i.e., the checksums from the blocks of B ) is sorted according to the 16-bit hash of the 32-bit rolling checksum. Each entry in the hash table points to the first element of the list for that hash value, or contains a null value if no element of the list has that hash value.
The second level check involves scanning the sorted checksum list starting with the entry pointed to by the hash table entry, looking for an entry whose 32-bit rolling checksum matches the current value. The scan terminates when it reaches an entry whose 16-bit hash differs. If this search finds a match, the third level check is invoked.
The third level check involves calculating the strong checksum for the current offset in the file and comparing it with the strong checksum value in the current list entry. If the two strong checksums match, we assume that we have found a block of A which matches a block of B. In fact the blocks could be different, but the probability of this is microscopic, and in practice this is a reasonable assumption.
We can see that the author adopted a separate chaining hash table to store checksums. Reason to choose for 16-bit hash and 2^16 entry hash table could be to reduce memory consumption for the hash table (in the implementation of rsync, a static array is used as a hash table
// rsync v0.1
//   match.c

#define TABLESIZE (1<<16)
#define NULL_TAG ((tag)-1)

static int false_alarms;
static int tag_hits;
static int matches;

struct target {
    tag t;
    int i;
};

static struct target *targets = NULL;

static tag tag_table[TABLESIZE];
).
Apparently, we can tune the hash table implementation accordingly to improve load balance, etc.
Implement rsync in golang
Recently, I have to implement a backup tool based on rsync. The tool needs to be development in golang. I have done a quick search on github and didn’t find some well tested pure golang rsync implementation, so, finally, I decide to implement it myself.
Requirement
The algorithm should be implemented as a standalone library. It needs to
- provide simple, easy to use interface
- support streaming IO, i.e., implement io.Writer interface in golang
For inbound and outbound data, it does not have to handle buffered IO itself, since buffering read, write is trivial in golang. While internally, it should consider low memory consumption.
Investigation
Before writing code, I have reviewed the rsync v0.1, cpp librsync to come up with a well suited programming model.
rsync v0.1
This implementation is very straightforward. It is the direct translation of the idea presented in the paper. It is comfortable to read the C code with the paper in hand. While it directly use mmap to read all data into a buffer, and in a monolithic function to handle checksum calculation and checksum searching. It does not allow streaming input. In my opinion, monolithic function is hard to fully test.
cpp librsync
librsync models it into a data driven state machine. The state transitions are driven by inbound data. This is a good abstraction. Dividing the whole logic into states also divides the monolithic function into small pieces, each function only needs to handle its logic in certain state. Furthermore, this improves testability. Librsync handles buffered IO itself. This kind of complicates the implementation.
The drawback is that, all logics, signature generation (weak, strong checksum calculation), delta generation, file reconstruction are modeled in one big state machine. This sacrifices the readability.
Internally, librsync uses a buffer to hold temporary data to calculate rolling and strong checksum. It moves remaining data in the buffer by memcpy if needed. The memcpy can be reduced by exploiting a ring buffer.
go rsync
Inspired by cpp librsync, the algorithm is modeled into data driven state machines. Unlike librsync, signature generation, delta generation, file reconstruction are modeled in to different state machines to improve readability and testability. Internally, a ring buffer is used to hold temporary data.
State machine and state function
So how to define a state machine in golang? I was inspired by a talk given by Rob Pike. Refer to these links:
There are two elements in a state machine: state and action.
State represents where we are and what we expect.
Action represents what we do.
Actions result in a new state.
Let’s put them together:
Executes an action, returns the next state?as a state function.
Recursive definition but simple and clear.
// stateFn represents the state of the scanner
// as a function that returns the next state.
type stateFn func(*lexer) stateFn
This comes up an clean and elegant way to model a state machine. Driving the state machine is trivial, as below.
// run lexes the input by executing state functions
// until the state is nil.
func run() {
    for state := startState; state != nil; {
        state = state(lexer)
    }
}
By this way, three state machines, SignatureGenerateWriter, DeltaGenerateWriter, and PatchWriter are defined to handle signature generation, delta generation, file reconstruction respectively. io.CloseWriter is implemented to support streaming write.
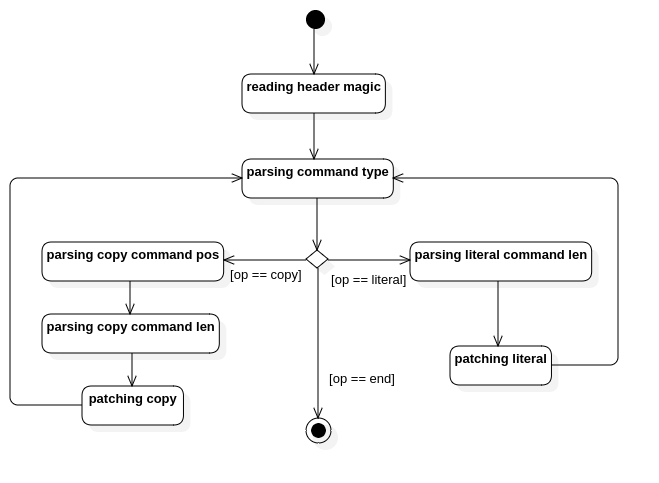
An example - PatchWriter
Here is an example of defining a state machine for reconstructing file. The input for reconstruction includes a file and a delta file generated from it. The delta file looks like below. It contains two types of command, the copy command and the literal command. copy command is followed by a block’s start position and length in the original file, where literal command is followed by the literal data length and its content.

Define states
At first step, we need to separate or define different states. I reckon that it is a trade off between readability and complexity. With states defined, we can draw the state diagram to define transitions. With this diagram, we can iteratively improve the states and transitions by reducing or merging redundant ones, or adding new states, transitions if needed.
For file reconstruction, I defined below states and transitions.
Declare state functions
With states clearly defined, declaring state functions is trivial. The hard part could be how you declare the state function signatures since you need to decide what kind of parameters need to pass.
I simply declared it as below since we have many ways to pass data into a function besides direct parameter passing, for example, struct data member, closure, etc.
// Here are some pseudo code snippets for demonstration only.

// The state function.
type stateFunc func() error

type patcher struct {
    //...
    stateFn stateFunc
    //...
}

// A set of state functions.
func (p *patcher) readHeaderMagic() error {
  //...
  p.stateFn = p.parseCmdType
  return nil
}

func (p *patcher) parseCmdType() error
func (p *patcher) parseCopyCmdPos() error
func (p *patcher) parseCopyCmdLen() error
func (p *patcher) patchCopy() error
func (p *patcher) parseLiteralCmdLen() error
func (p *patcher) patchLiteral() error
func (p *patcher) end() error

type PatchWriter struct {
    *patcher

    // ...
}

func (w *PatchWriter) Write(p []byte) (int, error) {
  //...

  // drive the state machine
  for w.stateFn != nil {
    err := w.stateFn()
    if err != nil {
      return nw, err
    }
  }

  return nw, nil
}
Implementation
With these state functions declared, we can start to think about the details, how to deal with IO, how to drive the state machine by inbound data, etc.
I like the state machine programming model. It helps us divide and conquer a monolithic problem, at the same time, improves testability.